Meeting Content
∆ Share work we have done
∆ come out the final idea for the website layout
∆ come out the title for the website (Cuptizen)
∆ Choose the 12 KL city life and related it to it particular cup
∆ Correct the website page ( Change idea which we decided to put the paper effect as the
background)
6. discuss the usage animation that suitable
∆ Apply different job for each member
∆ Krystal – Typography + Copywriting
∆ Wendy – mood board + water splash
∆ Zhen Kuan – illustration
∆ Lay Huey – website, the flash effect
∆ Each member have to come out at least some LOGO sketch
Conclusion for today meeting
∆ Job been apply to different member
∆ Come out the final idea for the website which is the sketchbook, paper, clip effect
∆ Related the 12 cup to its particular
∆ The rollover effect for the sound (shaking + sound)
Thursday, December 31, 2009
Thursday, December 17, 2009
Group Work during holiday =.=''
Lay huey will be incharge the whole website, the flash effect
Krystal more interesting into typography and her english quit good so she will incharge into the Copywriting, and very abstract description, which everything related to word and typo she will be incharge
Zhen Kuan more interesting into illustraction which he will be incharge to the illustraction part, which is the usage of the cup into doodle style of drawing and also photoshop effect
Me, which i feel i am quit ROJAK in the sense i dun have a really into the categories, one thing about me is i like to cup and paste, and everything i can do i will do, which i been put into the categories into small detail graphic, which i have to create the mood board, concept board, the water splash and helping some of my member this and that thing. And i am the one who incharge the sketchbook
For every of us must create our own pages (About us page)
HAPPY HOLIDAY
the holiday begin
this is the last meeting with group before holiday, we finalise our idea and apply different job for different member, after tutorial with mr sean, we finally has some idea to what should we further develop, which we dun have a overall mood, this is because our 12 mood board is only speak to the 12 mug and its characteristic, but how about the overall mood of the whole thing? than we finalise of our mood to a simple, white, empty and doodle drawing, which represent the empty of the mug(MUG is empty, with no feeling and character, and 4 of us we gave them a character and make them alive which reflect our main mood for the overall mood) (EMPTY = CHARACTER+FEELING+LIFE = COLOUR+LIFE) (from something empth to some thing)
Come out the Idea how the main page- intro page should look like?

Come out the Idea how the main page- intro page should look like?

The categories of the 12 item name(title) is too direct
1. Workaholic 7. Fashionista
2. Artsy fartsy 8. Urban Chic
3. Traditional 9. Touristy
4. Luxury 10. Poverty
5. Relax 11. Kiddy
6. Romantic 12. Commercial
So we have to come out word that is more abstract.
Layout of the website which we finalise our idea by using 2-3 columns,
1. loading page
2. Intro page
3. Main page
4. Concept page
5. Nagivation- 12 item page
6. About us- 4 page- Which each of our group member must use cup to represent us, and with a short description about why this cup reflect us, besude that we have to use doodle illustration to support our characteristic.
Thing Need to consider
Make it more magical ( not so direct and formal)
Push more boundaries
How it look like when everything put together
Wednesday, December 16, 2009
Flash Tutorial- Button
Flash Button
Step 1
first you go to your flash shortcut on the desktop. If it's not there, go to Start at the toolbar, click all programs, and find it in the list. Then, open it, click "flash document" and you have a new document.
Step 2
Draw what you want to be a button. It can be anything at all. Circle, square, text etc. Then, click the little black cursor at the top of the screen, and select what you drew to be the button. Press F8 to make it a symbol. Click button, and then click ok.
Step 3
Double click your button, and then there should be 4 spots that say "up" "over" "down" and "hit". press F6 3 times to add key frames to each frame. The up frame is what the button when look like when your mouse isn't touching it. The over frame is when your mouse is over the button, so you can click the shape and change the color or whatever you want. The down frame is what the button will look like when it is clicked. Usually people make it go down a little bit. Finally, hit is what the button will look like when you release the mouse button after clicking it.
Rain all the day
Morning - Wow- i like it alot, we explore different photography in the lab, and zhen kuan suddenly come out the idea that we can play around with the sound come out from MUG- Than when we play we realise that different size, shape and design of MUG really can come out different sound that is so...so...so...much interesting.
We surpose to have another outdoor photo shooting, but the time of outdoor shotting and Mr arthur tutorial Time quite tide, and it rain, so we set up another time on 28th of december, because we can use the picture that we have for the background.
http://www.youtube.com/watch?v=WYaYjVqKZQI
We surpose to have another outdoor photo shooting, but the time of outdoor shotting and Mr arthur tutorial Time quite tide, and it rain, so we set up another time on 28th of december, because we can use the picture that we have for the background.
http://www.youtube.com/watch?v=WYaYjVqKZQI
Tuesday, December 15, 2009
Sticker effect tutorial
This will show you how to create that slapped on sticker effect I’m sure you’ve seen popping up around the internet. Its simple to make but looks really good in pieces of art and also on webpages for example as an image link to an RSS feed. Read on to discover how to create these in only a few steps and learn a really easy way to achieve a 3D text effect at the same time.(Written by Ross)
Introduction
This sticker effect looks great when slapped on web pages, I’m sure you’ve noticed them for RSS feeds or post comments or something along those lines. Well the effect is simple to make and worth learning. I’d definitely recommend downloading the PSD file for this tutorial from the tutorial files page as It will come in handy especially in the last few steps just to refer to and is probably the best way of learning Photoshop. I’d also like to see how creative you can get with these stickers so upload your image at the end of the tutorial.

Step 1
Select the text tool and type some text, if you go Window>Character you will open up the character editor which will give you more control over the text. I used Impact regular italic as the font and also adjusted the tracking (horizontal spacing of characters) and the leading (vertical spacing between lines). You can now change the color of the text; for ‘PSD’ I used #ec7299 and for ‘LEARNING’ I used #62acd1 but feel free to experiment.

Step 2
Go into the blending options for the text layer and add a stroke with the settings shown below, using a dark blue as the color.

Step 3
We now want to make this look 3D, there are a few ways to this but most of them them would just overcomplicate this as we don’t need it too accurate. So firstly, create a new layer and choose a vanishing point which in mine I marked with a simple black dot. If the vanishing point is below the text it will give the appearance that we are looking up at it, if its above it will seem that we are looking down at it and the same rule applies for putting the vanishing point at the left or right. Things tend to stand out better and look bigger if we put the vanishing point below the object like I have done here. Next I selected the line tool and starting at the vanishing point I drew lines extending up to any outside edges that made a tangent. If you’ve done any technical drawing or graffiti art then this should be quite easy. Study the image below if you don’t know what I’m talking about.

Step 4
Create a new layer then move it below the text layer and make sure the foreground color is the same color as we used for the stroke. Select the polygonal lasso tool and make selections within the perspective lines then hit Alt+backspace to fill them with the dark blue color and do this for all the lines. If you did it correctly it should give the same effect as shown below.

Step 5
We want to get rid of part of the bit at the bottom so using the polygonal lasso tool again make a selection around the bit you want to get rid of then hit delete. You could also use a layer mask here if you think you might want to go back and change something. You can also delete all the perspective lines.
Step 6
Below I’ve shown what my layer panel looked like at this point so try and arrange your layers to look similar to this and make sure that the text layer and the 3D bits are within a layer group. Now right click on the layer group and if there is an option saying ‘Convert to Smart Object’ then click it, if not then go back and left click on the layer group and hit Ctrl+E to merge the group.

Step 7
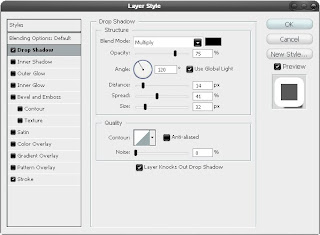
Right click on the merged layer or smart object then go to blending options and add a drop shadow and a stroke with the settings shown below.

Step 9
You can now add some extra things to your image; I’l breifly describe what I did. I flattened the pattern layer and added a displace filter using clouds as the map, if you don’t know much about the displace filter, I wrote another tutorial using it here. I also made a clouds layer above the pttern layer and set it to overlay. I used a splatter brush for just behind the sticker. I then used the brush tool with a 3px brush to give the effect of a biro pen.

Introduction
This sticker effect looks great when slapped on web pages, I’m sure you’ve noticed them for RSS feeds or post comments or something along those lines. Well the effect is simple to make and worth learning. I’d definitely recommend downloading the PSD file for this tutorial from the tutorial files page as It will come in handy especially in the last few steps just to refer to and is probably the best way of learning Photoshop. I’d also like to see how creative you can get with these stickers so upload your image at the end of the tutorial.

Step 1
Select the text tool and type some text, if you go Window>Character you will open up the character editor which will give you more control over the text. I used Impact regular italic as the font and also adjusted the tracking (horizontal spacing of characters) and the leading (vertical spacing between lines). You can now change the color of the text; for ‘PSD’ I used #ec7299 and for ‘LEARNING’ I used #62acd1 but feel free to experiment.

Step 2
Go into the blending options for the text layer and add a stroke with the settings shown below, using a dark blue as the color.

Step 3
We now want to make this look 3D, there are a few ways to this but most of them them would just overcomplicate this as we don’t need it too accurate. So firstly, create a new layer and choose a vanishing point which in mine I marked with a simple black dot. If the vanishing point is below the text it will give the appearance that we are looking up at it, if its above it will seem that we are looking down at it and the same rule applies for putting the vanishing point at the left or right. Things tend to stand out better and look bigger if we put the vanishing point below the object like I have done here. Next I selected the line tool and starting at the vanishing point I drew lines extending up to any outside edges that made a tangent. If you’ve done any technical drawing or graffiti art then this should be quite easy. Study the image below if you don’t know what I’m talking about.

Step 4
Create a new layer then move it below the text layer and make sure the foreground color is the same color as we used for the stroke. Select the polygonal lasso tool and make selections within the perspective lines then hit Alt+backspace to fill them with the dark blue color and do this for all the lines. If you did it correctly it should give the same effect as shown below.

Step 5
We want to get rid of part of the bit at the bottom so using the polygonal lasso tool again make a selection around the bit you want to get rid of then hit delete. You could also use a layer mask here if you think you might want to go back and change something. You can also delete all the perspective lines.

Step 6
Below I’ve shown what my layer panel looked like at this point so try and arrange your layers to look similar to this and make sure that the text layer and the 3D bits are within a layer group. Now right click on the layer group and if there is an option saying ‘Convert to Smart Object’ then click it, if not then go back and left click on the layer group and hit Ctrl+E to merge the group.

Step 7
Right click on the merged layer or smart object then go to blending options and add a drop shadow and a stroke with the settings shown below.

Step 8
Now hit Ctrl+T to enter free transform mode then move and scale this layer like shown in the image below.
Step 9
You can now add some extra things to your image; I’l breifly describe what I did. I flattened the pattern layer and added a displace filter using clouds as the map, if you don’t know much about the displace filter, I wrote another tutorial using it here. I also made a clouds layer above the pttern layer and set it to overlay. I used a splatter brush for just behind the sticker. I then used the brush tool with a 3px brush to give the effect of a biro pen.


Monday, December 14, 2009
what a lazy day
just come back from college.... 2day we have such a long time meething...for morning section we have our meething in McD...hehe...while eating while discuss and chatting,..hehe...we finally apply job for every group member, each of us get 3 item....3 different characteristic....i quit happy that krystal come and join us, she seen quit ok, but i can see in deeper she still cannot let it go, time will make her feel batter, all we need is TIME....WELCOM BACK KRYSTAL....we meet jasmine, amir, eliot and iman...hehe
after lunch we go back studio to discuss further our planing through the week, which WED we will have photo shooting in college in the morning and afternoon after krystal workshop we go together to KL...than we have a finalising meeting after that, further discuss and apply job, and thursday we will have a meeting in the morning and afternoon tutorial= Hope everything going ok....after tutorial, we will depand what mr sean say and than we will have a meeting and apply job for everyone and we will go for 1 week holiday, of course within the 1 week holiday, we need to finish all our own job, and we will come back on 28th december to combine all the thing together, and correct everything...
GOOD LUCK+WORK HARD
Sunday, December 13, 2009

Ingenious Ideas for Mugs
Like Strong Coffee?
Is it a mug or a weapon? At least you can get a good grip on it. Punch coffee mug is a masterly thing!

Keep Everything Home
Here’s a dunk mug – a mug with a convenient ceramic basement for your food stores.

Camera Drink
You can almost make the one like that yourself dismantling your camera. Doesn’t it look stunning?

Nuclear Associations for Power Fans
This set is a pretty close imitation of a nuclear power plant. Let it smoke and feel the power

Is It One or Three?
While your guests wonder how you manage it, you have quite a comfy drink no matter what handle you are using.

A Tell-Tale Cup
Do you think it looks a bit ordinary? It does – until you fill it up. At once it changes its color and the legend to tell you that the party is ON!

Join Me in a Drink
You can link your cup now to another one… actually, to as many as five other cups… with a cute cross on the side. For company lovers as well as for those who like their drink to be a long one

When Helpers Are Painted On
This is a mug that will never drip down on things!

Get a Drink from Anamorphic Cylinders
An ages-old visual trick restored for those who want to read what is printed onto their porcelain saucers. These steel cups provide a good mirror effect with the inscription carefully made to be turned into neat calligraphics.

Everything around us is interesting
Maybe we did not realize, I mean before this project I also didn’t realize that there are so many thing is interesting that we didn’t realize, it is all around us, MUG, is such a simple everyday life thing we seen, we use, but we didn’t realize how is important it is for us, on the other hand, it such an interesting object. There are so many thing been create in different foam, different design to attract us. Design are so incredible.
Is it a mug or a weapon? At least you can get a good grip on it. Punch coffee mug is a masterly thing!

Here’s a dunk mug – a mug with a convenient ceramic basement for your food stores.

Camera Drink
You can almost make the one like that yourself dismantling your camera. Doesn’t it look stunning?

This set is a pretty close imitation of a nuclear power plant. Let it smoke and feel the power

While your guests wonder how you manage it, you have quite a comfy drink no matter what handle you are using.

Do you think it looks a bit ordinary? It does – until you fill it up. At once it changes its color and the legend to tell you that the party is ON!

You can link your cup now to another one… actually, to as many as five other cups… with a cute cross on the side. For company lovers as well as for those who like their drink to be a long one

When Helpers Are Painted On
This is a mug that will never drip down on things!

Get a Drink from Anamorphic Cylinders
An ages-old visual trick restored for those who want to read what is printed onto their porcelain saucers. These steel cups provide a good mirror effect with the inscription carefully made to be turned into neat calligraphics.

Maybe we did not realize, I mean before this project I also didn’t realize that there are so many thing is interesting that we didn’t realize, it is all around us, MUG, is such a simple everyday life thing we seen, we use, but we didn’t realize how is important it is for us, on the other hand, it such an interesting object. There are so many thing been create in different foam, different design to attract us. Design are so incredible.
Thursday, December 10, 2009
2nd tutorial
Idea development about the usage of the cup, our group come out about 12 different kinds of cup, and we discuss the overall element, the interaction and the webpage design, and we have tutorial with mr sean, (we discuss our group concept which is using CUP to put in different characteristic into it, and bring them alive, and this characteristic will reflect certain kind of people in KL. Beside that we will use different usage fo rhte cup and make it into a flash movie.) The feedback of the tutorial is, our group object too random, is quit good for the group work and everything, but the object is too many, so after discuss with mr sean, we have a another meething that we finalised the 12 different cup into 1= MUG, which is the similar cup but in different design speack to certain/ reflect certain kind of people in KL lifestyle, different people use the similar cup for different way. A cup for different people may have certain meaning into it, certain cup represent certain characteristic to certain people.
^^
*******************************Work hard******************************
^^
*******************************Work hard******************************
Wednesday, December 9, 2009
What a busy day
just now me and zhen kuan go KLCC and petaling street take some research picture...haizz....ley huey not feeling well, so we less 1 member, maby bcos of the rushing for essay she didnt sleep well.... i quit long time didnt see krystal, she got some problem i can feel that is quit a big problem, hope she can handle the problem, and we only have 1 more week to holiday, have to work hard, and next week is the mock up, hope 2morrow idea will be ok, and hope hey huey feeling better and she can joing us, because her thinking is quit good, out selected item is also from her idea......
Thursday, December 3, 2009
The journal begins
Today meeting is quit success, we finally come out a chosen idea between so many directions, and start to apply job in group for other member, while tutorial that we get a good feedback from out tutor, which give us a good confidences to go further. With the support by my friend which make me understand more about the topic and we did share a lot of different opinion, that why for today which we come out the conclusion for our idea easily, beside that we apply job well for different member, every member have their own job, we have to discuss and plan well for out Art Directions, mood board and concept board, and I quit happy that in between our member that all of them have really strong idea and thinking which make me learn something that is, we have to see thing in many different place and point of view, which something we really can do it by our self, to day I steal some tips which teach by my friend, they did give me a lot of idea to do research even it is not related to this project which is about the essay research. Can wait to have my holiday, even I know still have to do a lot of thing during holiday.
Wednesday, December 2, 2009
HOME
We are living in exceptional times. Scientists tell us that we have 10 years to change the way we live, avert the depletion of natural resources and the catastrophic evolution of the Earth's climate.
The stakes are high for us and our children. Everyone should take part in the effort, and HOME has been conceived to take a message of mobilization out to every human being.
For this purpose, HOME needs to be free. A patron, the PPR Group, made this possible. EuropaCorp, the distributor, also pledged not to make any profit because Home is a non-profit film.
HOME has been made for you : share it! And act for the planet.
Yann Arthus-Bertrand
watch it
http://www.youtube.com/watch?v=jqxENMKaeCU
HOME official website
http://www.home-2009.com/
PPR is proud to support HOME
http://www.ppr.com/
HOME is a carbon offset movie
http://www.actioncarbone.org/
More information about the Planet
http://www.goodplanet.info/
Group project
The beginning of December, today just receive a brief-sign in the city, quit interesting project, at least is something new for me, but inside my mine all is about holiday, the brief state the holiday period is coming soon and i can't wait for that even i know that during holiday still have to do my project, just miss my HOME...
For this project I try to break away with my best friend, which we always stick together. have to work a lot with computer skill and my computer skill sucks... hope can steal some tips from other (smile secretly) from ley hui, zhen kuan and krystal...thay are my group member in this project, that i personaly think everyone have their good at...illustraction, typography and computer skill...and me, i hope can find out what i good and interest in the categories...
Ganbatte Wendy....find your own style
Warm-up blog
I purposely open another new account for my blog, because in this project that required us to have blog, the other reason is since I have a new msn account for my GD year 2, so just make full use of it, since my last blog quit a long time I didn’t look for it, maybe I already forgot its password, haha, hope I really can make full use of this blog, which I can stated all my design life in it. My English not so good, if any friend who read my blog hope you can correct my language for me, haha, so while I write my blog I also can learn something. Hope I will not use this journal half way.
Subscribe to:
Comments (Atom)